After improper shutdown or power failure, windows automatically scans your driver on the next boot for any errors and tries to repair them automatically. However, encountering the “Scanning and Repairing Drive” message every time the system boots can be frustrating. Users report “every time I turn on my PC it says scanning and repairing drive c:” This problem typically signals an issue with your storage drive or the file system, which Windows attempts to address during the startup process. This article explores the common reasons behind this and comprehensive solutions to fix Scanning and Repairing Drive Every Time Windows 11 Boots.
Why does Windows 11 Display the Scanning and Repairing Drive Message?
The “Scanning and Repairing Drive” process is a feature in Windows PC, initiated by the built-in Check Disk (CHKDSK) utility. This tool automatically runs during boot if the system detects potential errors or inconsistencies in your storage drive. Most of time, Windows 11 Displays the Scanning and Repairing Drive Message after Improper Shutdowns.
- Bad Sectors on the Drive: Hard drives or SSDs may develop bad sectors, which can trigger the repair process.
- File System Errors: Issues like fragmented files, incomplete file transfers, or missing metadata can lead to disk checks.
- Pending Drive Scans: If a previous scan was interrupted or incomplete, Windows might repeatedly attempt the process.
- Disk Corruption: Malware, software bugs, or aging hardware can contribute to disk corruption, causing recurring scans.
- Faulty or Loose Connections: Poor connections between the drive and motherboard may create read/write errors.
Run SMART Scan to Check Disk Health
If you are experiencing scanning and repairing drive c: on every startup the first thing you need to check the health of your SSD or hard disk drive (HDD). If the disk is failing, it’s recommended to back up your important data immediately and consider replacing the drive.
Many modern laptops and motherboards include disk health-checking utilities within the UEFI/BIOS interface.
- Restart your PC and press the key (e.g., Del, F2, or F12) to enter the BIOS.
- Look for a section like Storage Configuration or System Health.
- Use the built-in diagnostic tool to check your disk status.
Consult your system’s user manual or official forums for instructions specific to your hardware.
Again Manufacturers like Samsung, WD, and Seagate offer proprietary software to assess drive health.
- Examples include Samsung Magician for Samsung SSDs or WD Dashboard for WD drives.
- Download these tools from the official website of your disk manufacturer.
- Run the utility and check the S.M.A.R.T. (Self-Monitoring, Analysis, and Reporting Technology) status of your disk.
Also, you can run third-party disk health check tools:
- CrystalDiskInfo: A free tool that provides detailed information about your disk’s health, temperature, and performance metrics.
- SSD Life: Designed specifically for SSDs, it offers a quick health status overview.
- CrystalDiskMark: Useful for benchmarking disk performance and detecting abnormalities.
Disable Auto Scan and Repair the Drive Manually
If your HDD or SSD is in good condition, but Windows display scanning and repairing drive c: on every startup, you can disable the auto scan feature and run the repair manually when necessary.
- Press Win + S, type Command Prompt and select Run as Administrator.
- Type command chkntfs /x C: and press enter key to tell Windows to exclude the specified drive from automatic checks during boot.
- Well, If you want to restore the default behaviour you can re-enable it by typing: chkntfs /d
Once auto-scanning is disabled, you can manually check and repair the drive at your convenience:
- Again open the command prompt as administrator and run the command chkdsk C: /f /r
- You will be prompted to schedule the scan for the next restart if the drive is in use. Press Y to confirm.
- Close the command prompt and reboot your PC to scan and repair disk for errors.
Run System File Checker (SFC) and DISM Tools
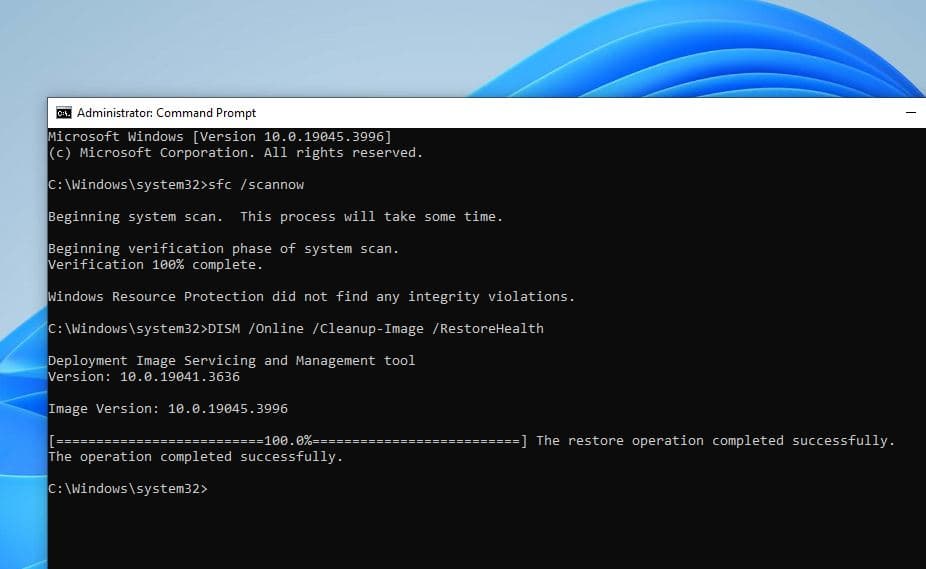
Again Corrupted system files can lead to persistent drive scans at boot. Use the SFC and DISM utilities to scan and repair these files.
- Open the Elevated Command Prompt.
- Type the following commands and press Enter after each:
DISM /Online /Cleanup-Image /RestoreHealthSFC /Scannow
- Once the scanning is complete 100% restart your PC and check if this helps.

Update Disk Drivers
Outdated or corrupt drivers can cause communication issues between Windows and your drive. If the above solutions don’t help, you need to update disk drivers to fix the issue.
- Press Win + X and select Device Manager.
- Expand the Disk drives section.
- Right-click your drive and choose Update driver.
- Select Search automatically for updated driver software.
In addition, Loose or faulty connections can cause read/write errors, leading to repeated scans.
- Turn off your computer and unplug it from the power source.
- Open the case and check the SATA cables connecting your drive to the motherboard.
- Re-seat the cables or replace them if they appear damaged.
To avoid encountering this problem again, follow these best practices:
- Back Up Regularly: Use external drives or cloud services to back up important data.
- Use Reliable Power Supplies: Avoid sudden shutdowns by investing in a UPS.
- Perform Routine Maintenance: Clean up your drive and check for errors periodically.
- Update Windows and Drivers: Keep your system updated to prevent compatibility issues.
- Monitor Drive Health: Use SMART monitoring tools to keep an eye on your drive’s performance.